Introduction
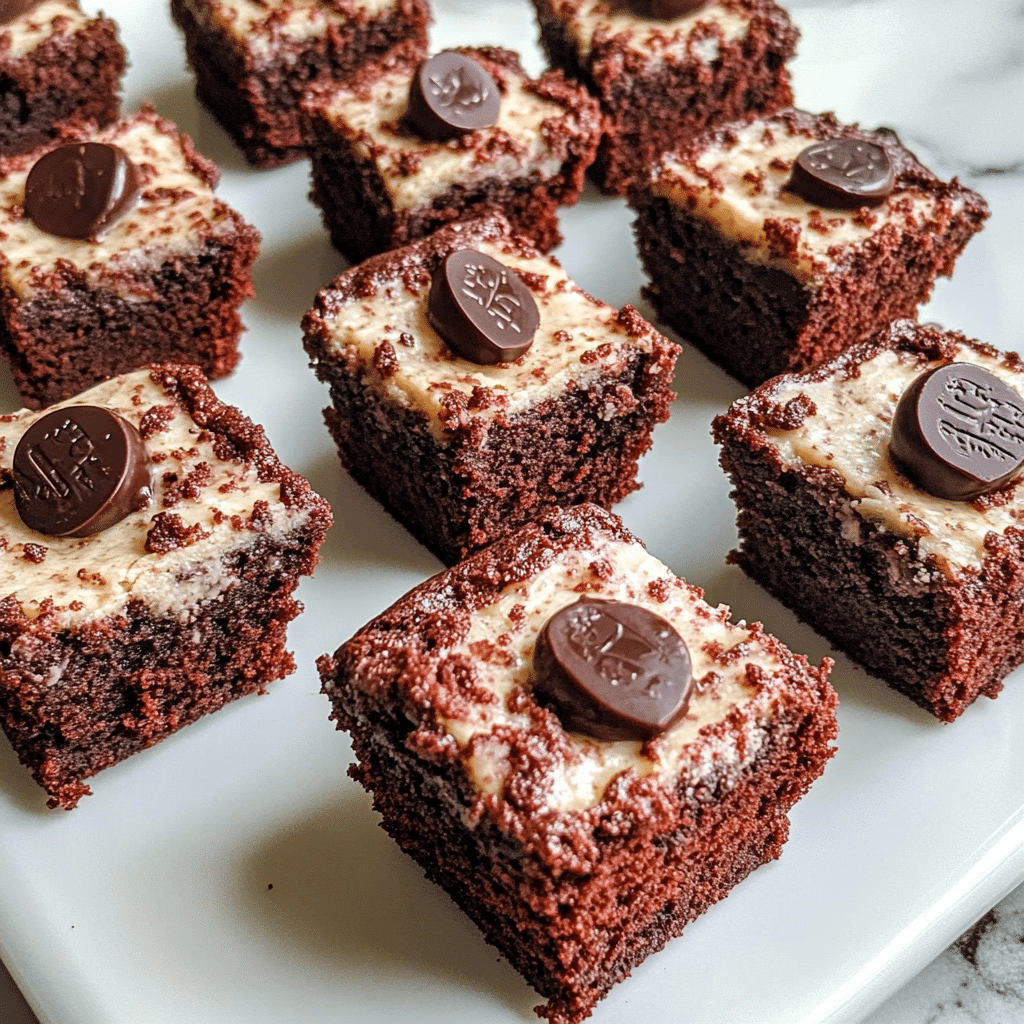
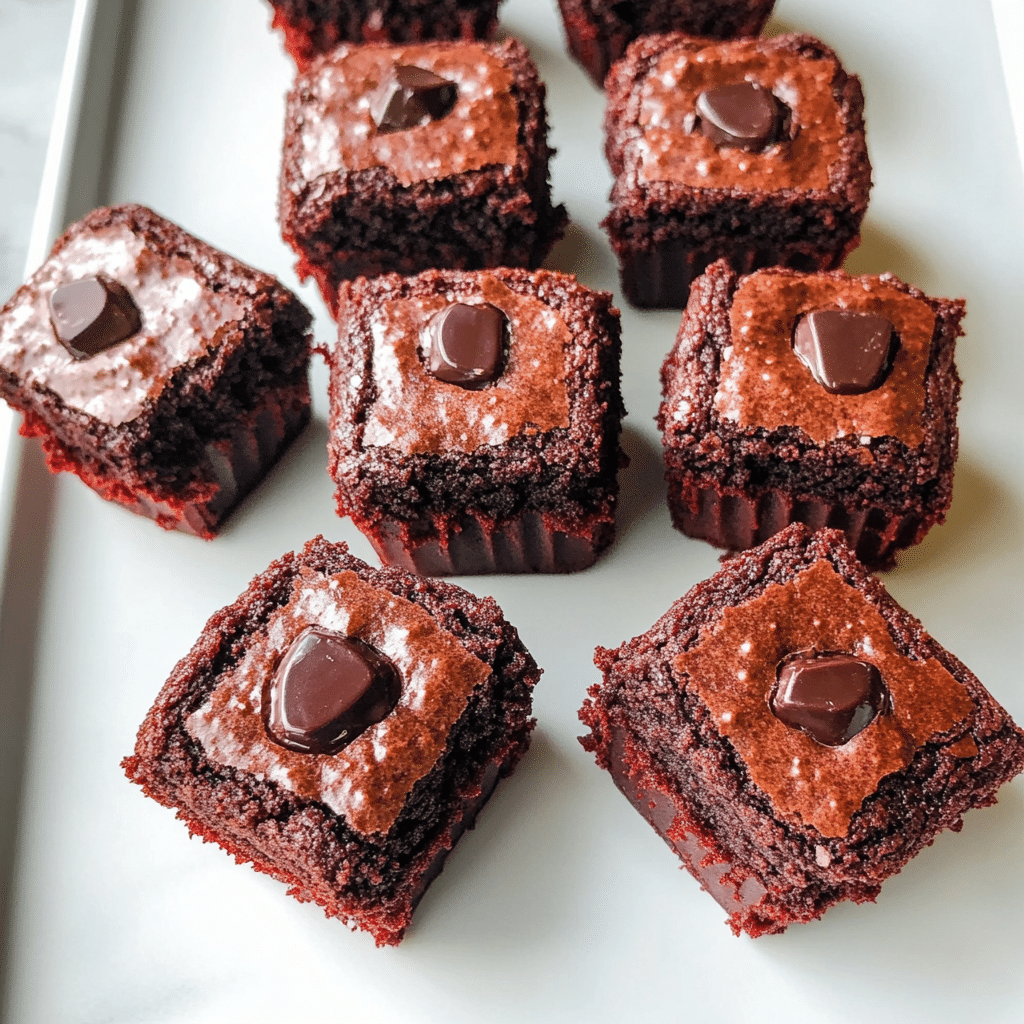
If you’re a fan of red velvet cake and brownies, then you’re in for a treat! Mini Dark Chocolate Stuffed Red Velvet Brownies are a game-changer when it comes to dessert. They bring together the best of both worlds— the rich, moist, and slightly tangy flavor of red velvet, and the indulgent, gooey melt-in-your-mouth goodness of dark chocolate. I mean, who wouldn’t love that combo?
These brownies are the perfect dessert for any occasion, from a cozy night in to a special celebration with family and friends. What I love most about these little bites of heaven is how they’re the ideal balance of textures: soft, fudgy brownies with a rich dark chocolate center. Every bite gives you a little pop of surprise, with the dark chocolate oozing out, making each mini brownie just a little more magical.
I first came up with this recipe after realizing that I couldn’t pick between my two favorites: red velvet and brownies. It was one of those moments where I thought, “Why not both?” So, I threw caution to the wind and experimented. The result was a showstopper. These mini stuffed brownies quickly became a hit at home, and now, I’m sharing them with you! I hope they bring as much joy to your kitchen as they did to mine.
Why You’ll Love This Recipe
There are so many reasons why this Mini Dark Chocolate Stuffed Red Velvet Brownie recipe is worth trying. Let’s take a look:
- A Perfect Combination of Flavors: The combination of red velvet and dark chocolate is nothing short of magical. The subtle tanginess of the red velvet batter pairs perfectly with the richness of the dark chocolate, making each bite a true treat for your taste buds.
- Gooey and Fudgy Texture: These brownies are soft and fudgy, but the surprise dark chocolate center adds an extra layer of gooeyness that makes them irresistible.
- Mini But Mighty: They’re mini in size, but huge in flavor! Perfect for snacking, gifting, or serving at your next party.
- Perfect for Any Occasion: Whether you’re celebrating a holiday, hosting a dinner party, or just craving something sweet, these brownies will never disappoint.
- Impressive Yet Easy: Despite their decadent appearance, they’re super easy to make. If you’re new to baking, this recipe will help boost your confidence while impressing everyone with your baking skills!
Preparation Time and Servings
- Total Time: 1 hour
- Prep Time: 20 minutes
- Cooking Time: 40 minutes
- Servings: This recipe makes about 12 mini brownies (depending on the size of your baking dish).
Nutrition Facts
- Calories per serving: 230
- Protein: 2g
- Carbs: 28g
- Fat: 14g
- Fiber: 2g
- Sugar: 18g
Ingredients
For these Mini Dark Chocolate Stuffed Red Velvet Brownies, you’ll need a few simple ingredients that pack a punch of flavor.
- For the Red Velvet Brownie Batter:
- 1 cup all-purpose flour
- 1/2 cup cocoa powder
- 1/2 tsp baking powder
- 1/4 tsp salt
- 1/2 cup unsalted butter, melted
- 1 cup granulated sugar
- 2 large eggs
- 1 tsp vanilla extract
- 1 tbsp red food coloring
- 1/2 cup buttermilk (or milk with a splash of vinegar)
- 1 tbsp white vinegar
- For the Dark Chocolate Filling:
- 1 cup dark chocolate chips or chunks (use halal-certified chocolate)
- 1 tbsp unsalted butter (to help create a smooth, creamy filling)
- For the Topping:
- A pinch of sea salt (optional, but it adds a lovely contrast to the sweetness of the brownies)
Step-by-Step Instructions
Let’s break this recipe down into easy-to-follow steps, so you can bake with confidence and make these brownies like a pro.
- Preheat Your Oven and Prep Your Pan
Before you start mixing up the ingredients, preheat your oven to 350°F (175°C). Line a 12-cup muffin tin with cupcake liners or lightly grease each cavity with butter or non-stick spray. - Prepare the Dark Chocolate Filling
In a microwave-safe bowl, combine your dark chocolate chips or chunks with butter. Heat in 20-second intervals, stirring in between, until the chocolate is fully melted and smooth. Set it aside to cool slightly. This will create that irresistible, gooey chocolate center we’re going for. - Mix the Dry Ingredients for the Brownie Batter
In a large bowl, whisk together the flour, cocoa powder, baking powder, and salt. These dry ingredients will ensure your brownies rise and have that classic chewy texture. - Mix the Wet Ingredients
In a separate bowl, whisk together the melted butter and granulated sugar until smooth and well combined. Add the eggs one at a time, mixing well after each addition. Stir in the vanilla extract, red food coloring, buttermilk (or milk with vinegar), and vinegar. The red food coloring is key to giving these brownies their signature red velvet look. Don’t worry if the batter looks a little runny—it’s supposed to be that way! - Combine the Wet and Dry Ingredients
Gradually fold the dry ingredients into the wet mixture, stirring gently until the batter is just combined. Be careful not to overmix, as this can make the brownies dense. - Assemble the Brownies
Spoon a small amount of brownie batter into the bottom of each muffin cup, just enough to cover the base. Then, take a teaspoon of the melted dark chocolate filling and drop it into the center of each brownie batter mound. Cover the chocolate with a little more brownie batter, ensuring it’s fully enclosed. - Bake
Bake your mini dark chocolate stuffed red velvet brownies in the preheated oven for 18-20 minutes. Keep an eye on them—use a toothpick to check for doneness. If it comes out clean with just a few moist crumbs, they’re ready. - Let Them Cool
Once out of the oven, let the brownies cool in the pan for about 5 minutes before transferring them to a wire rack to cool completely. Don’t skip this step! Allowing them to cool will make them much easier to handle.
How to Serve
These brownies are perfect on their own, but here are a few ideas to elevate the experience:
- Serve with a scoop of vanilla ice cream for a creamy, dreamy dessert.
- Drizzle with a little extra melted dark chocolate for a decadent touch.
- Top with a pinch of flaky sea salt to balance out the sweetness.
- Pair with a cup of freshly brewed coffee or a glass of milk for that classic brownie-and-milk combo.
Additional Tips
- Don’t Skip the Cooling Time
Cooling these brownies before serving ensures the chocolate center stays gooey and doesn’t run out too soon. Plus, they’ll hold together better when you take them out of the muffin tin. - Use High-Quality Dark Chocolate
Since dark chocolate is a key part of this recipe, I highly recommend using high-quality chocolate. The richness will shine through and make a big difference in the final product. - Room Temperature Ingredients
Make sure your butter, eggs, and buttermilk are at room temperature before starting. This will help everything come together smoothly and result in a creamier batter. - Don’t Overbake
Overbaking these brownies can make them dry. Keep an eye on them and pull them out when the toothpick comes out with just a few moist crumbs. - For a More Intense Red Velvet Flavor
If you want a stronger red velvet flavor, you can add a teaspoon of cocoa powder to the batter along with the dry ingredients.
Recipe Variations
There are so many fun ways you can make this recipe your own! Here are a few variations you can try:
- Vegan: Swap the eggs and butter for plant-based alternatives. Use a flax egg and vegan butter for a completely vegan version of these brownies.
- Gluten-Free: Use a gluten-free all-purpose flour blend to make this recipe gluten-free. Just make sure to check that the rest of the ingredients (like your chocolate) are also gluten-free.
- Bacon Lovers: If you’re feeling adventurous, add crispy turkey bacon bits into the brownie batter for a savory twist.
- Peanut Butter Swirl: For a peanut butter lover’s version, swirl some creamy peanut butter into the batter before baking.
- Nutty Addition: Add chopped nuts, like walnuts or pecans, to the brownie batter for an extra crunch.
Serving Suggestions
- Side Dishes: Pair these brownies with a fresh fruit salad or a light, refreshing green salad to balance out the richness of the brownies.
- Beverages: A cold glass of milk or a hot cappuccino makes a great drink pairing for these decadent brownies.
Freezing and Storage
- Storage: Store your leftover brownies in an airtight container at room temperature for up to 3 days. They’ll stay fresh and delicious.
- Freezing: To freeze, place your cooled brownies in a single layer on a baking sheet and freeze until solid. Once frozen, transfer them to a freezer-safe container for up to 3 months. To reheat, simply microwave for 20-30 seconds for that fresh-out-of-the-oven experience.
Special Equipment
- Muffin Tin: The key to these mini brownies is a muffin tin, which helps them cook evenly and creates the perfect little portion sizes.
- Cupcake Liners: These make it easier to remove the brownies from the tin and help them keep their shape.
- Microwave-Safe Bowl: For melting the dark chocolate and butter.
FAQ Section
- Can I use store-bought red velvet cake mix?
Yes, you can. Just follow the instructions on the package for the cake batter, and then proceed with stuffing the chocolate in the middle as described. - What if I don’t have buttermilk?
You can substitute with regular milk and a tablespoon of white vinegar or lemon juice. - Can I make these ahead?
Yes, you can prepare and bake the brownies ahead of time, store them in an airtight container, and reheat them when needed.

Mini Dark Chocolate Stuffed Red Velvet Brownies
- Total Time: 1 hour
Ingredients
- For the Red Velvet Brownie Batter:
- 1 cup all-purpose flour
- 1/2 cup cocoa powder
- 1/2 tsp baking powder
- 1/4 tsp salt
- 1/2 cup unsalted butter, melted
- 1 cup granulated sugar
- 2 large eggs
- 1 tsp vanilla extract
- 1 tbsp red food coloring
- 1/2 cup buttermilk (or milk with a splash of vinegar)
- 1 tbsp white vinegar
- For the Dark Chocolate Filling:
- 1 cup dark chocolate chips or chunks (use halal-certified chocolate)
- 1 tbsp unsalted butter (to help create a smooth, creamy filling)
- For the Topping:
- A pinch of sea salt (optional, but it adds a lovely contrast to the sweetness of the brownies)
Instructions
- Preheat Your Oven and Prep Your Pan
Before you start mixing up the ingredients, preheat your oven to 350°F (175°C). Line a 12-cup muffin tin with cupcake liners or lightly grease each cavity with butter or non-stick spray. - Prepare the Dark Chocolate Filling
In a microwave-safe bowl, combine your dark chocolate chips or chunks with butter. Heat in 20-second intervals, stirring in between, until the chocolate is fully melted and smooth. Set it aside to cool slightly. This will create that irresistible, gooey chocolate center we’re going for. - Mix the Dry Ingredients for the Brownie Batter
In a large bowl, whisk together the flour, cocoa powder, baking powder, and salt. These dry ingredients will ensure your brownies rise and have that classic chewy texture. - Mix the Wet Ingredients
In a separate bowl, whisk together the melted butter and granulated sugar until smooth and well combined. Add the eggs one at a time, mixing well after each addition. Stir in the vanilla extract, red food coloring, buttermilk (or milk with vinegar), and vinegar. The red food coloring is key to giving these brownies their signature red velvet look. Don’t worry if the batter looks a little runny—it’s supposed to be that way! - Combine the Wet and Dry Ingredients
Gradually fold the dry ingredients into the wet mixture, stirring gently until the batter is just combined. Be careful not to overmix, as this can make the brownies dense. - Assemble the Brownies
Spoon a small amount of brownie batter into the bottom of each muffin cup, just enough to cover the base. Then, take a teaspoon of the melted dark chocolate filling and drop it into the center of each brownie batter mound. Cover the chocolate with a little more brownie batter, ensuring it’s fully enclosed. - Bake
Bake your mini dark chocolate stuffed red velvet brownies in the preheated oven for 18-20 minutes. Keep an eye on them—use a toothpick to check for doneness. If it comes out clean with just a few moist crumbs, they’re ready. - Let Them Cool
Once out of the oven, let the brownies cool in the pan for about 5 minutes before transferring them to a wire rack to cool completely. Don’t skip this step! Allowing them to cool will make them much easier to handle.
- Prep Time: 20 minutes
- Cook Time: 40 minutes
Nutrition
- Serving Size: 12
- Calories: 230
- Sugar: 18g
- Fat: 14g
- Carbohydrates: 28g
- Fiber: 2g
- Protein: 2g
Conclusion
I hope you’re as excited as I am to try these Mini Dark Chocolate Stuffed Red Velvet Brownies! They’re guaranteed to be a hit at your next gathering or as a special treat for yourself. Don’t forget to snap a photo and tag me on Instagram so I can see your amazing creations. I can’t wait to hear what you think!